Tips_tutorials > Studiojs201 > Studio JS 201 (All Contents)
Introduction
Welcome to the tutorial. (JS stands for JavaScript)
The tutorial is the first in a series of tutorials which take you step by step through writing an Omnis Studio ultra-thin web application. An ultra-thin web application does not use the Omnis Web Client plug-in. Users can interact with your Omnis Studio application using , , or ... no plug-ins required! Functionality on the client side is provided using JavaScript. Page decoration (fonts, colors, borders, etc.) control on the client side is provided by CSS (Cascading Style Sheets).
I wrote my first Omnis Studio web app in 2003 for the Wingham Cemetery. I used the . Initially the app seemed good, but I kept running into problems with glitches with the Omnis web client plug-ins between different versions of browsers. Also, each time the client upgraded or changed computers they had to go through the Omnis web client installation. This proved to be too difficult for low level computer users.
In 2005 I started tinkering around with PHP and JavaScript. I discovered that you can do some pretty amazing and powerful stuff with PHP and JavaScript! I started thinking about writing web apps using PHP & JavaScript... dropping Omnis Studio altogether. But I had numerous Omnis Studio applications running on LANs with runtime clients. I was also very familiar and productive with Omnis Studio. Writing and debugging code in Omnis Studio is a cake walk, compared to JavaScript. One character out of place in JavaScript and nothing runs.
The best thing in my situation was to make use of the code I'd already written in Omnis Studio and extend my applications to the web using the Omnis Web App Server, ultra-thin client, JavaScript, and CSS.
I rewrote the Wingham Cemetery app in 2006 using the Omnis Web App Server, ultra-thin client, JavaScript, and CSS. The results were very encouraging. Performance was excellent. The customer could access, update, and insert cemetery records from any computer, anywhere, anytime. No plug-ins, no delays. They loved it, and so did I.
You can try out the public search page of the Wingham Cemetery at www.vencor.ca/cemetery/wingham/search
At the time of writing this tutorial the Wingham Cemetery web app is running on a headless MacMini. FrontBase is being used for the database.Overview
There are several components to the ultra-thin client application you will be building in this tutorial.
- The Omnis Studio library which contains the remote task classes.
- Omnis Web App Server is the instance of Omnis Studio listening for messages from the CGI or Script. If it receives a request it instantiates the specified remote task and sends it a $construct message with the HTTP request parameters in a row variable.
- The web server which receives standard HTTP requests. Port 80 is the default port for HTTP requests.
- The CGI or Script which handles communication between the web browser and the Omnis Web App Server.
- The user's web browser which displays web pages sent to it from the web server.
- JavaScript which adds functionality to the web page and sends requests to the web server CGI or script.
The following communication takes place in the demo we will be building.
- Using a web browser the user requests a static web page from the web server, searchcountries.htm
- The webserver responds with the HTML which the web browser displays to the user.
- The user fills in a search value and clicks the button on the web page.
- The button calls a JavaScript function which checks to make sure a search value has been entered, and then sends the request to the web server CGI or script.
- The request is processed and forwarded to the Omnis Web App Server which instantiates the specified remote task in the specified library and sends a $construct message with the HTTP parameters in a row variable.
- The remote task processes the request building the HTML for a new page with the search results. The HMTL page is returned to the Omnis Web App Server which passes it back to the CGI or Script which passes it back to the web browser.
- The web browser displays the HTML to the user.
Here is the finished product of what we are going to build in this tutorial.
Getting Started
The series tutorial assumes you have completed the series tutorials.
Completing the Studio 100 series tutorials is not mandatory, though it is highly recommended. If you are an experienced Omnis Studio developer you will be able to whip through the Studio 100 series tutorials quickly. If you are fairly new to Omnis Studio do not tackle the Studio JS 200 series tutorials before completing the Studio 100 series tutorials!
The first thing you need to do is get the localhost web server running on your computer, and the Omnis Web App Server working on your computer. Refer to your Omnis Studio documentation and to for information on getting this working.
Please do not email me with questions on how to get your localhost web server and the Omnis Web App Server working on your computer. Send your questions to the Omnis Dev mailing list or Omnis Tech Support. There are just too many variations of installations and possible problems for me to help you out. (The simplest solution I know of is to use Mac OS X.)
The next thing you need to do is download and install , if you don't already have it. At the time of writing this, is the best tool for testing and debugging JavaScript.
Once you have the Omnis Web App Server working on your local computer and installed you are ready to proceed with this tutorial.
We will begin with the Studio 100 series Contacts library. It already has schema classes, query classes, table classes, and a database with records.
The objective of this tutorial is to be able to search and view the Country table records from a web browser.ContactsWeb Library
To make sure that we are all starting from the same place, download the StudioJS201 zip file from studiotips.net.
- Go to - www.studiotips.net/downloads/
- Click the link to download the file.
- Unzip the file.
The folder comes with a ContactsWeb.lbs library and a Contacts.df1 data file. - Open the ContactsWeb.lbs library. When you open the library it automatically opens a session with the data file and installs a menu.

If you are a StudioTips member and have StudioTips version 2007-01-26 or greater you have the completed code available to you via the . Go to the . Any code used in this tutorial is available to you by clicking the button in the window when viewing the appropriate step of the tutorial. You can then copy and paste the sample code into the ContactsWeb library you are working on.
Create Ping Remote Task
One of the first remote tasks I create in my web apps is an rtPing remote task. The rtPing remote class responds with a simple HTML page whenever it receives a message. This allows me to test communication from a web browser through the Omnis Web App Server to a remote task in my Omnis Studio library.
- > Select ContactsWeb library.
- Click . Name the remote task rtPing.
- Add a parameter, pParams, Row data type to the $construct method of the rtPing remote task.
- Add the following code to the $construct method of rtPing.
; Copy the the params row parameter to a local variable.
Calculate ParamsRow as pParams
; Write a message to the trace log.
Calculate Mssg as con("Web App Ping received at ",jst(#D,'D:y-M-D H:N.S')," - ",$clib().$name,"/",$cmethod().$name)
Send to trace log {[Mssg]}
; Return a ping message page.
Do method retPingReplyHTMLContents Returns HTML
Do method addHTTPContentHeader (HTML)
Quit method HTML
If you have StudioTips you can copy any of the code snips by clicking the button which takes you to the actual code then copy and paste the code to your own method.
- Add a retPingReplyHTMLContents method to rtPing with the following code:
Begin text block
Text: <html> (Carriage return,Linefeed)
Text: <head> (Carriage return,Linefeed)
Text: <title>Omnis Studio Web App Ping</title> (Carriage return,Linefeed)
Text: </head> (Carriage return,Linefeed)
Text: <body> (Carriage return,Linefeed)
Text: <h3>Omnis Studio Web App Ping</h3> (Carriage return,Linefeed)
Text: <p>Ping test communication successful!</p> (Carriage return,Linefeed)
Text: <p>$clib().$name = [$clib().$name]</p> (Carriage return,Linefeed)
Text: <p>$cclass().$name = [$cclass().$name]</p> (Carriage return,Linefeed)
Text: <p>$ctask().$name = [$ctask().$name]</p> (Carriage return,Linefeed)
Text: <p>$prefs.$serverport = [$prefs.$serverport]</p> (Carriage return,Linefeed)
Text: </body> (Carriage return,Linefeed)
Text: </html> (Carriage return,Linefeed)
End text block
Get text block HTML
Quit method HTML - Add an addHTTPContentHeader method to rtPing
- Add a parameter, pfHTML, Field reference type to the method.
- Add the following code to the method.
Calculate ContentLength as len(pfHTML)
; HTTP Content type header.
Begin text block
Text: Content-type: text/html (Carriage return,Linefeed)
Text: Content-length: [ContentLength] (Carriage return,Linefeed)
Text: (Carriage return,Linefeed)
End text block
Get text block HTTPHeaderText
Calculate pfHTML as con(HTTPHeaderText,pfHTML)
Quit method kTrue
Test Ping Remote Task
Open a web browser and enter the URL which applies to your localhost web server:
- Mac OS X - http://localhost/cgi-bin/nph-omniscgi?OmnisServer=5912&OmnisLibrary=ContactsWeb&OmnisClass=rtPing
- WinXP IIS - http://localhost/Script/omnisapi?OmnisServer=5912&OmnisLibrary=ContactsWeb&OmnisClass=rtPing
All going well the rtPing remote task will receive your request and respond to you with a new web page. If you don't get a response try putting a breakpoint in the $construct method of rtPing. If you do not hit the breakpoint when requesting the above specified URL in your web brower, there is likely a problem with your Omnis Web App Server setup.
You must get the rtPing remote task response working before proceeding any further.
If after trying for 30 minutes you are still stuck, zip your ContactsWeb folder and email it to doug@vencor.ca. I'll check and test it and let you know what I find out.HTTP Request URL Syntax
Take a moment to study the HTTP request URL which we sent to the web server.
http://localhost/cgi-bin/nph-omniscgi?OmnisServer=5912&OmnisLibrary=ContactsWeb&OmnisClass=rtPing
The URL breaks down into 2 parts:
- The URL address - the first part up to the ? character.
- The parameters - the part after the ? character.
The syntax of each parameter is simple. ParamName=Value
Each parameter is separated from the next by the & ampersand character. You can include up to 400 parameters in the URL which you send to the Omnis Web App Server.
The only required parameters are:
- OmnisServer - the port which the Omnis Web App Server is listening on.
- OmnisLibrary - the library containing the remote task we wish to instantiate.
- OmnisClass - the name of the remote task we wish to instantiate.
The Omnis Web App Server parses the parameters and put them into a row variable which it passes as the first parameter to the $construct method of the specified remote task. The ParamName becomes the column name, and the Value is copied to the row. Each column is a kCharacter data type.
Once you know the syntax the Omnis Web App Server it really isn't that complicated. Understanding the syntax of the HTTP request URL is important because we will be using JavaScript to generate our own HTTP requests later on in the tutorial.
As you can see, we don't even need a web page to send requests to the Omnis Web App Server. We can simply type in the URL following the Omnis Web App Server syntax in our browser, click the go/load button, and we will get the appropriate HTML returned to our browser from the Omnis Studio remote task via the web server.HTML Tools
Rather than put all of our code in methods of each remote task, we will put the general methods in an object class which we can call from different remote tasks. This may seem a bit complicated at first, but you will see the benefits later on as we add more remote tasks.
- > select ContactsWeb library > > .
- Name the object class, oHTMLTools
Return HTML Template
We will need a method that returns an HTML page template.
- Add a public method, $retHTMLPageTemplate to oHTMLTools.
- Add the following code to the method:
Begin text block
Text: <html> (Carriage return,Linefeed)
Text: <head> (Carriage return,Linefeed)
Text: <title>##TITLE##</title> (Carriage return,Linefeed)
Text: </head> (Carriage return,Linefeed)
Text: <body> (Carriage return,Linefeed)
Text: (Carriage return,Linefeed)
Text: (Carriage return,Linefeed)
Text: <p>##BODY##</p> (Carriage return,Linefeed)
Text: (Carriage return,Linefeed)
Text: </body> (Carriage return,Linefeed)
Text: </html> (Carriage return,Linefeed)
End text block
Get text block HTML
Quit method HTML
##TITLE## and ##BODY## are placeholders which can be replaced by the sender using the replaceall() function. You will see this later on in the tutorial.

This is a very basic HTML page. For your real world application you would need to include numerous additional sections and tags.
Convert List to HTML Table
We will need a method than converts an Omnis Studio list into an HTML table.
- Add a public method, $convertListToHTMLTable, to the oHTMLTools.
If you have StudioTips you can copy any of the code snips by clicking the button which takes you to the actual code, then copy and paste the code to your own method.
- Add the following parameters to the method:
- pfList - field reference
- pbInclSelectCheckBoxes - booleann default kTrue
- pCSVColNames - character
- pCSVColHeadings - character
- pPrimayKeyColName - character
- Add the following class variables:
- kTableCloseTag - character - initial value '</table>'
- kTableDivCloseTag - character - init value '</td>'
- kTableDivOpenTag - character - init value '<td>'
- kTableOpenTag - character - initial value '<table>'
- kTableRowCloseTag - character - init value '</tr>'
- kTableRowOpenTag - character - init value '<tr>'
- Add the following code to the method:
Calculate List as pfList
; Open the table
Calculate HTML as kTableOpenTag
; Open the table header group.
Calculate HTML as con(HTML,kCr,'<thead>')
Calculate HTML as con(HTML,kCr,kTableRowOpenTag)
; Add a checkbox column for selecting rows.
If pbInclSelectCheckBoxes
Calculate HTML as con(HTML,kCr,'<th>','','</th>')
End If
; Add the header row columns.
Calculate String as pCSVColHeadings
While len(String)
Calculate Text as strtok('String',',')
Calculate HTML as con(HTML,kCr,'<th>',Text,'</th>')
End While
; Close the table header row
Calculate HTML as con(HTML,kCr,kTableRowCloseTag)
; Close the table header group.
Calculate HTML as con(HTML,kCr,'</thead>')
; Open the table body group.
Calculate HTML as con(HTML,kCr,'<tbody>')
; Add the list rows and columns.
For List.$line from 1 to List.$linecount step 1
; Open the row.
Calculate HTML as con(HTML,kCr,kTableRowOpenTag)
; Add a checkbox column for selecting rows. The primary key is stored in the checkbox id attribute.
If pbInclSelectCheckBoxes
If List.0.$selected()
Calculate SelectCheckBox as con('<input type="checkbox" name="selected" id="',List.[pPrimaryKeyColName],'" value="pkey" checked="true" />')
Else
; Do not include a 'checked=' attribute. checked="false" or "0" still caused it to be checked.
Calculate SelectCheckBox as con('<input type="checkbox" name="selected" id="',List.[pPrimaryKeyColName],'" value="pkey" />')
End If
Calculate HTML as con(HTML,kCr,kTableDivOpenTag,SelectCheckBox,kTableDivCloseTag)
End If
; Add the columns.
Calculate String as pCSVColNames
While len(String)
Calculate ColName as strtok('String',',')
Calculate HTML as con(HTML,kCr,kTableDivOpenTag,List.[ColName],kTableDivCloseTag)
End While
; Close the list row
Calculate HTML as con(HTML,kCr,kTableRowCloseTag)
End For
; Close the table body group.
Calculate HTML as con(HTML,kCr,'</tbody>')
; Open the table footer group.
Calculate HTML as con(HTML,kCr,'<tfoot>')
; Close the table footer group.
Calculate HTML as con(HTML,kCr,'</tfoot>')
; Close the table.
Calculate HTML as con(HTML,kCr,kTableCloseTag)
Quit method HTML
Add HTTP Content Header
We will need a method than adds the Content-type and Content-length header to the HTML.
- Add a public method, $addHTTPContentHeader, to oHTMLTools.
- Add the following code to the method. (You can copy this code from the rtPing class which you created earlier.)
Calculate ContentLength as len(pfHTML)
; HTTP Content type header.
Begin text block
Text: Content-type: text/html (Carriage return,Linefeed)
Text: Content-length: [ContentLength] (Carriage return,Linefeed)
Text: (Carriage return,Linefeed)
End text block
Get text block HTTPHeaderText
Calculate pfHTML as con(HTTPHeaderText,pfHTML)
Quit method kTrue
Countries List
We are now ready to tackle creating a remote task that will fetch records from the database and return it as an HTML page.
The simplest table in our database is the Country table. We will begin with creating a remote task that will return a web page listing all of the countries in our database.
Create the remote task.
- > select ContactsWeb library > > .
- Name the remote task, rtCountryList.
Task Variables
The first problem we are going to run into is that the instance of rtCountryList opened by the Omnis Web App Server is not in scope with the Startup_Task instance. They live in two different worlds.
The Startup_Task has two task variables that we would like to access from our remote task instance:
- dbsessionobj - The session which was opened with the database on startup.
- errhndlr - The error handler which was initialized on startup.
Being able to access those Startup_Task variables from our remote task would save waste time opening a new session and initializing another error handler each time a remote task request came in.
To accomplish this we need to add a method to the Startup_Task.
- Add a $getTaskVarRef method to the Startup_Task.
- Add a parameter, pTaskVarName, to the method.
- Add a parameter, pfrVar, to the method.
- Add the following code to the method:
Set reference pfrVar to [pTaskVarName].$ref
Quit method kTrue
The $getTaskVarRef method sets a reference to the specified task variable.
To minimize code in the $construct method of rtCountryList we will use a private method to set the remote task task variables.
- Add the following task variables to rtCountryList.
- dbsessionobj - variable
- errhndlr - variable
- Add a private method, setTaskVars to rtCountryList.
- Add the following code to the setTaskVars method.
Do $itasks.[$clib().$name].$getTaskVarRef('dbsessionobj',$ctask.dbsessionobj) Returns FlagOK
If FlagOK
Do $itasks.[$clib().$name].$getTaskVarRef('errhndlr',errhndlr) Returns FlagOK
End If
Quit method FlagOK
$construct Method
We are finally ready to write the code in the $construct method of our rtCountryList remote task.
- Add an type instance variable, ioHTMLTools, to the rtCountryList class.
- Point ioHTMLTools to the oHTMLTools object class.
- Add a type parameter, pParamsRow to the $construct method. (Do not attempt to make this a field reference variable! I discovered the hard way that Omnis Studio doesn't like that.)
- Add the following code to the $construct method.
; Set the task variables.
Do method setTaskVars Returns FlagOK
If FlagOK
; Define a list variable using the 'tCountry' table class.
Do List.$definefromsqlclass('tCountry')
; Set the session object in the list variable so that the SQL statements will be issued to that session's database.
Do List.$sessionobject.$assign(dbsessionobj)
; Get all the records in the table.
Do List.$getAllRecords() Returns FlagOK
If FlagOK
; Prepare HTML table to return to the web browser.
Calculate bInclCheckboxes as kTrue
Calculate CSVColHeadings as 'Country Name'
Calculate CSVColNames as 'CountryName'
Calculate PKeyColName as List.$:PrimaryKeyColName
Do ioHTMLTools.$convertListToHTMLTable(List,bInclCheckboxes,CSVColNames,CSVColHeadings,PKeyColName) Returns TableHTML
; Get an HTML page template.
Do ioHTMLTools.$retHTMLPageTemplate() Returns HTML
; Replace the placeholders with content.
Calculate HTML as replaceall(HTML,'##TITLE##','Countries')
Calculate HTML as replaceall(HTML,'##BODY##',TableHTML)
; Add the HTTP content header.
Do ioHTMLTools.$addHTTPContentHeader(HTML) Returns FlagOK
End If
End If
If not(FlagOK)
Breakpoint
End If
Quit method HTML
Test Countries Remote Task
We are ready to test the rtCountryList remote task.
Open a web browser and enter the URL which applies to your localhost web server:
- Mac OS X - http://localhost/cgi-bin/nph-omniscgi?OmnisServer=5912&OmnisLibrary=ContactsWeb&OmnisClass=rtCountryList
- WinXP IIS - http://localhost/cgi-bin/nph-omniscgi?OmnisServer=5912&OmnisLibrary=ContactsWeb&OmnisClass=rtCountryList
All going well the rtCountryList remote task will receive your request and respond to you with a new web page listing the countries in the database.
The page won't look fancy. Don't worry we can dress it up later using CSS (Cascading Style Sheets).Web Error Handling
We put a Breakpoint near the end of the $construct method if FlagOK was false. Breakpoints, OK, Yes/No, No/Yes messages, and any modal prompts are a big no, no, with web related code. The reason is that the prompt will show up on the server and no response will be sent to the web browser. The Omnis Web App Server will be stuck and unable to responds to any further requests from other web browsers. You get the picture. Someone will have to go to the server, click the OK button on the dialog window before any new requests can be processed. Not a good thing!
We therefore need to add as method to the error handler that we created in and add a new method to oHTMLTools.Error Handler Method
The error handler has a $promptonceLastError method which opens a modal prompt. We need to add a method which passes back the last error message text, rather than opening a prompt.
- > double-click oErrorHandler
- Add a new method, $getonceLastError
- Add the following parameters to the method
- pfRetMssg - Field reference - Pass back the last error message.
- pfRetMethod - Field reference - Pass back the method which logged the last error.
- Add the following code to the method. (You can copy the code from $promptonceLastError and then modify it.)
; Only return the error message values the first time this method is called.
If iErrorsList.prompted=kFalse
; Set the prompted flag to true to avoid multiple prompts of the same error message.
Calculate iErrorsList.prompted as kTrue
; Pass the error message text and method name to the sender.
Calculate pfRetMssg as iErrorsList.errormssg
Calculate pfRetMethod as con(iErrorsList.libname,'/',iErrorsList.classname,'/',iErrorsList.methodname)
End If
Quit method kTrue
HTML Tools Method
We will add a $retHTMLLastError method to oHTMLTools. This method will get the last error from the error handler, and then format it into an HTML page that is ready to return to the web browser via the Omnis Web App Server.
- Add a method, $retLastErrorHTML, to oHTMLTools.
- Add the following code to the method.
; Get the last error message logged with the error handler.
Do errhndlr.$getonceLastError(Mssg,Method) Returns FlagOK
If len(Mssg)=0
Calculate Mssg as "An error occured, but was not logged to the error handler. Please notify the webmaster."
End If
Calculate Title as 'Error'
; Prepare the HTML for the body section of the web page.
Begin text block
Text: <h3>[Title]</h3> (Carriage return,Linefeed)
Text: (Carriage return,Linefeed)
Text: [Mssg] (Carriage return,Linefeed)
End text block
Get text block Body
; Prepare the HTML for a web page that displays the error.
Do $cinst.$retHTMLPageTemplate Returns HTML
Calculate HTML as replaceall(HTML,'##TITLE##',Title)
Calculate HTML as replaceall(HTML,'##BODY##',Body)
Do $cinst.$addHTTPContentHeader(HTML)
Quit method HTML
Fix Remote Task $construct
We can now replace the Breakpoint in the $construct method of rtCountryList with a call to oHTMLTools.
- Go to the Breakpoint near the end of the $construct method of rtCountryList.
- Replace it with a $retLastErrorHTML message to oHTMLTools. The end of the $construct method should look like this:
If not(FlagOK)
; An error occurred. Get the last error as an HTML page.
Do ioHTMLTools.$retLastErrorHTML() Returns HTML
End If
Quit method HTML
Search Countries Web Page
So far, we have been sending our HTTP requests to the web server by manually typing the URL in the web browser. Obviously that isn't a very user friendly way to send requests to the Omnis Web App Server.
We are ready to create a static web page that uses JavaScript to send a request to the Omnis Web App Server when the user clicks the button.
This tutorial is not intended to teach you everything you need to know about HTML and JavaScript. If you decide to develop an Omnis Studio ultra-thin web application you will need to purchase a couple of books on JavaScript, HTML, and CSS. Two books which I recommend are:
- by Goodman, Morrison
- by Pfaffenberger, Schafer, White, Karow.
You can buy these books online from Amazon.
You will need to use a text editor to create and edit your web pages, JavaScripts, and CSS.
If you are on the MacOS X platform get if you don't already have it. It is the programmer's best friend for editing HTML, JavaScript, CSS, PHP, etc.
Create Search Page
- Using a text editor create an HTML file with the following content. (You can copy and paste the HTML from here.)
<html>
<head>
<title>Countries</title>
</head>
<body>
<h3>Countries</h3>
<p>Enter the first letter of a country and click the Search button</p>
<form name="SearchForm" method="POST" action="http://localhost/cgi-bin/nph-omniscgi"> <!-- start SearchForm -->
<input type="text" name="SearchValue" size="1"/>
<input type="submit" value="Search" title="Click to search for the records." />
<input type="hidden" name="OmnisServer" value="5912" />
<input type="hidden" name="OmnisLibrary" value="ContactsWeb" />
<input type="hidden" name="OmnisClass" value="rtCountryList" />
</form> <!-- end SearchForm -->
</body>
</html> - Replace cgi-bin/nph-omniscgi with the appropriate cgi or script as applicable to your local host.
- Save the text file as searchcountries.htm to your local host web server directory.
- Open the web browser.
- Load the web page. http://localhost/searchcountries.htm
- Click the button. All going well the list of all the countries in the database will be returned to you.
Add $getWhere to tBase
We need to modify our Omnis Studio application to handle searching for records which begin with a certain value. The LIKE operator in SQL is used to search for records which begin with, contain, or end with, a certain value.
We need to add a $getSelect method to tBase to make it easy for use to pass in a WHERE clause and get back the records from the database.
- Add the method, $getSelect, to tBase.
- Add a type parameter pWhereText to the method.
- Copy the code from $getAllRecords to the $getSelect method.
- Modify the $getSelect method code so that it reads as follows:
; Prepare the ORDER BY text.
If len(pOrderBySQL)
Calculate OrderBy as pOrderBySQL
Else
Calculate OrderBy as $cinst.$:DefaultOrderBy
End If
Calculate SQLText as pWhereText
If pos("WHERE ",$cinst.$extraquerytext)
Calculate SQLText as replace(SQLText,"WHERE ","AND ")
End If
; Prepare the SQL text to exclude the empty zero(0) primary key record.
Calculate ColName as $cinst.$:PrimaryKeyColName
If len(ColName)=0
Calculate FlagOK as kFalse
Else
If pos("WHERE ",$cinst.$extraquerytext)|len(SQLText)
Calculate SQLText as con(SQLText," AND ",ColName," <> 0")
Else
Calculate SQLText as con("WHERE ",ColName," <> 0")
End If
Calculate SQLText as con(SQLText,' ',OrderBy)
; Select all the records in the table.
Do $cinst.$select(SQLText) Returns FlagOK
If not(FlagOK)
Calculate Mssg as con("Flag false after $cinst.$select(",SQLText,") for the $sqlclassname ",$cinst.$sqlclassname,".")
Do errhndlr.$logError($cmethod,Mssg)
Else
; Fetch all the records in the table.
Do $cinst.$fetch(kFetchAll) Returns FetchStatus
If not(FetchStatus)
Calculate FlagOK as kFalse
Calculate Mssg as con("Flag false after $cinst.$fetch(kFetchAll) for the $sqlclassname ",$cinst.$sqlclassname,".")
Do errhndlr.$logError($cmethod,Mssg)
Else
; Set the current line to the first line.
Do $cinst.$line.$assign(1)
End If
End If
End If
Quit method FlagOK
Add LIKE to Remote Task
We need to modify the $construct method of the rtCountryList remote task to get countries which begin with the search value entered in the web form by the user. We will prepare a WHERE clause which uses the LIKE operator and call the $getWhere method of the table class.
- Go to the $construct method of the rtCountryList remote form.
- Add a local variable, Value, character data type.
- Add a local variable, SQLText, character data type.
- Replace the $getAllRecords section of the method so that the method reads as follows:
; Set the task variables.
Do method setTaskVars Returns FlagOK
If FlagOK
; Use the upper case value of the first character they entered.
Calculate SearchValue as upp(mid(pParams.SearchValue,1,1))
; Define a list variable using the 'tCountry' table class.
Do List.$definefromsqlclass('tCountry')
; Set the session object in the list variable so that the SQL statements will be issued to that session's database.
Do List.$sessionobject.$assign(dbsessionobj)
; Prepare the WHERE clause.
Calculate SQLText as con("WHERE CountryName LIKE '",SearchValue,"%'")
; Select and fetch the records beginning with the search value.
Do List.$getSelect(SQLText) Returns FlagOK
If FlagOK
; Prepare HTML table to return to the web browser.
Calculate bInclCheckboxes as kTrue
Calculate CSVColHeadings as 'Country Name'
Calculate CSVColNames as 'CountryName'
Calculate PKeyColName as List.$:PrimaryKeyColName
Do ioHTMLTools.$convertListToHTMLTable(List,bInclCheckboxes,CSVColNames,CSVColHeadings,PKeyColName) Returns TableHTML
; Get an HTML page template.
Do ioHTMLTools.$retHTMLPageTemplate() Returns HTML
; Replace the placeholders with content.
Calculate HTML as replaceall(HTML,'##TITLE##','Countries')
Calculate HTML as replaceall(HTML,'##BODY##',TableHTML)
; Add the HTTP content header.
Do ioHTMLTools.$addHTTPContentHeader(HTML) Returns FlagOK
End If
End If
If not(FlagOK)
; An error occurred. Get the last error as an HTML page.
Do ioHTMLTools.$retLastErrorHTML() Returns HTML
End If
Quit method HTML
Test Search LIKE
Test searching for a country that begins with a letter.
Keeping the Search Form
We have a problem with our user interface in that the search form (search field and button) is lost when the results are returned to the web brower.
There are a number of ways we can solve solve this:
- Add the seach form to the HTML that is returned to the web browser.
- Add a frame to the web page. The upper portion of the web page would contain the search form. The lower portion of the web page would be filled with the frame. The frame would be used to display the search results. JavaScript would be used to send the search form request via the frame so that the HTML results from the Omnis Web App Server would be returned to the frame, not entire page.
- Use an XMLHTTPRequest object to submit the request and receive the results and JavaScript to dynamically add the results to the static page.
The problem with solution #1 is that the search form HTML in our Omnis Studio application has to exactly match the search form HTML in the static page or the search form on the results page won't match the look of the static page. Whenever a change is made to the static page, the HTML in the Omnis Studio application will have to be update. That gets to be a headache as we add more and more pages.
Solution #3 requires a fair bit of JavaScript and DHTML (Dynamic HTML) knowledge. Not something we want to tackle at this stage in the tutorial.
Solution #2 is the one we will pursue.Adding a Frame
This is where the fun begins. Be prepared for some hair pulling adventures. You might want to take a coffee break before you dive into this section. We are going to have to tackle both HTML frames and JavaScript to get this working.
- Make a backup copy of the searchcountries.htm file and name the copy searchcountries_bak1.htm
- Open searchcountries.htm and add the following iframe tag just before the closing </body> tag.
<iframe id="SearchResults" name="SearchResults" src="" width="100%" height="100%" scrolling="yes"></iframe> - View the page in . http://localhost/searchcountries.htm
Depending on your browser, you may or may not see a large black frame fill the lower portion of the web page. If you right-click anywhere in the lower portion of the window there should be one or more additional context menu lines that deal with frames. (, , etc.
Ping Page JavaScript
Our first baby step into the JavaScript world will be to add a Ping Page alert to our web page.
- Add the following JavaScript in the <head> section of the web page.
<script>
function pingPage() {
alert("Ping Page");
}
</script>
This tutorial is not intended to teach you JavaScript syntax. There is a plethora of information about JavaScript on the internet. The , recommended earlier in this tutorial, is excellent an excellent reference manual for JavaScript.
- Add the following button to the <body> section of the web page.
<input type="button" value="Ping Page" onclick="pingPage()" />
- Reload the searchcountries.htm page in FireFox.
- The Ping Page button should appear on the page.
- Click the button. A JavaScript alert should appear with the message text Ping Page.
Adding a JavaScript File
Putting loads of JavaScript in HTML files is not a good idea. In fact, you probably shouldn't put any JavaScript in your HTML files. Instead put all of your JavaScript in .js files and then load and call the from your HTML files.
- Start a new file in your text editor and enter the following JavaScript function in the file.
function pingFile() {
alert("Ping File");
} - Create a directory inside your web server directory and name it js
- Save the text file as countries.js into the js directory.
Ping File JavaScript
- Add the following JavaScript in the <head> section of the searchcountries.htm web page.
<script type="text/javascript" src="../js/countries.js"></script>
This tells the web browser to load the countries.js JavaScript file which is located in the js directory. You could supply the full URL to the JavaScript file. The JavaScript file can be located on another server... anywhere in the world.
You can load as many JavaScript files as you like. JavaScript functions in the .js files are called the same way you would call them if they were directly inside the HTML file. - Add the following button to the <body> section of the web page.
<input type="button" value="Ping File" onclick="pingFile()" /> - Reload the searchcountries.htm page in FireFox.
- The Ping File button should appear on the page.
- Click the button. A JavaScript alert should appear with the message text Ping File.
If the Ping File alert did not appear use the FireFox to debug your code.
Having a JavaScript ping function is handy for testing communication. If all else fails, add a ping function and button to your page and test to make sure that at least it works.
Submit Form Via the Frame
As we have learned earlier in this tutorial, when we clicked the button, the input values inside the <form> were sent as parameters to the web server using the method and action specified by the form. The request was then processed by the Omnis Web App Server. The entire contents of the web page which sent the request to the web server was replaced.
Instead of submiting the search form from the main page, we are going to gather the information from the search form using JavaScript and then send a request to the web server via the lower frame. That way the HTML returned by our Omnis Studio web app will fill the frame, rather than the whole page.
We'll do this one step at a time, and test each step as we go.Submit Form 1 - Button & Function
- Add a button to the searchcountries.htm static web page.
<input type="button" value="Submit Search via Frame" onclick="submitSearchViaFrame()" />
This can be in the line directly after the input button. - Add the following JavaScript function to the countries.js file.
function submitSearchViaFrame() {
alert("Start submitSearchViaFrame");
} - Reload the web page in FireFox. The new button should appear. Click the button to make sure the new function is being called.
Working with JavaScript it is a good practice to write a small chunk of code and test it, then write some more, and test again. Debugging JavaScript is a bear, so you want to find and fix errors one small step at a time. Remember to use the to debug your code. It will tell you the location of the first error it hits.
Submit Form 2 - Get Base URL
Now add the code to the submitSearchViaFrame function which gathers the information are going to need.
- Modify the submitSearchViaFrame function so that it reads as follows:
function submitSearchViaFrame() {
//alert("Start submitFormViaFrame");
// Get a reference to the Search Form
var rForm = document.SearchForm ;
// Get the action property from the form.
var URL = rForm.action
alert("URL = " + URL);
}
You can comment out code in JavaScript using the // double slash charaters.
- Reload the web page in FireFox. Click the button. The alert message should report something like: URL = http://localhost/cgi-bin/nph-omniscgi
Submit Form 3 - URL with Parameters
Now we'll build the full URL which we want to point the frame to.
- Modify the submitSearchViaFrame function so that it reads as follows:
function submitSearchViaFrame() {
//alert("Start submitFormViaFrame");
// Get a reference to the Search Form
var rForm = document.SearchForm ;
// Get the action property from the form.
var URL = rForm.action
alert("URL = " + URL);
// Get the search value from the form's entry field.
var SearchValue = rForm.SearchValue.value
alert("SearchValue = " + SearchValue);
var OmnisServer = rForm.OmnisServer.value
alert("OmnisServer = " + OmnisServer);
var OmnisLibrary = rForm.OmnisLibrary.value
alert("OmnisLibrary = " + OmnisLibrary);
var OmnisClass = rForm.OmnisClass.value
alert("OmnisClass = " + OmnisClass);
URL = URL + "?" + "OmnisServer=" + OmnisServer + "&OmnisLibrary=" + OmnisLibrary + "&OmnisClass=" + OmnisClass + "&SearchValue=" + SearchValue;
alert("URL = " + URL);
} - Reload the web page in FireFox. Click the button. The alert message should report something like: URL = http://localhost/cgi-bin/nph-omniscgi?OmnisServer=5912&OmnisLibrary=ContactsWeb&OmnisClass=rtCountryList&SearchValue=
Submit Form 4 - Set Frame URL
The final step is to point the frame to the URL causing it to send an HTTPRequest to the web server. The frame's src (source) property is what points it to a specific web page. All we need to do is set the src property to the URL and we will taste the sweet victory of success.
- Comment out all the alerts in the submitSearchViaFrame function.
- Add the following JavaScript to the end of the function, just before the closing } character.
// Get a reference to the frame
var rFrame = document.getElementById("SearchResults");
alert("Frame ID = " + rFrame.id);
// Point the frame to the URL
rFrame.src = URL ; - Reload the web page in FireFox. Click the button. All going well a list of countries will appear in the frame on your web page.
- Enter the first letter or a country in the search value entry field and click the button. All going well the countries beginning with the letter you type will be listed in the frame on your web page.
Congratulations! You have an ultra-thin client Omnis Studio application up and running! Go ahead and test if from other web browsers.

Unfortunately, Internet Explorer is not a fully W3C compliant. There are a few little JavaScript glitches that you will run into between FireFox, Internet Explorer, and Safari. If you run into one of these, do a Google search and you'll likely be able to find a work around.
Eliminating the Form
The <form> on the static page isn't actually needed. On my web apps I usually put all of the hidden inputs at the bottom of the <body> section of the web page. I also add a hidden input called WebAppServerCGI with its value set to the URL path to the Omnis CGI or Script.
Eliminating the form and moving the inputs to the bottom of the page, makes for a very simple HTML page.
Here is what the cleaned up HTML page looks like:
<html>
<head>
<title>Countries</title>
<script type="text/javascript" src="../js/countries.js"></script>
</head>
<body>
<h3>Countries</h3>
<p>Enter the first letter of a country and click the Search button</p>
<input type="text" id="SearchValue" name="SearchValue" size="1" />
<input type="button" value="Search" onclick="submitSearchViaFrame()" />
<iframe id="SearchResults" name="SearchResults" src="" width="100%" height="100%" scrolling="yes"></iframe>
<input type="hidden" id="WebAppServerCGI" value="http://localhost/cgi-bin/nph-omniscgi" />
<input type="hidden" id="OmnisServer" value="5912" />
<input type="hidden" id="OmnisLibrary" value="ContactsWeb" />
<input type="hidden" id="OmnisClass" value="rtCountryList" />
</body>
</html>
Here is what the cleaned up submitSearchViaFrame JavaScript function looks like:
function submitSearchViaFrame() {
// Gather the hidden inputs needed to assemble the URL
var CGI = document.getElementById("WebAppServerCGI").value
var OmnisServer = document.getElementById("OmnisServer").value
var OmnisLibrary = document.getElementById("OmnisLibrary").value
var OmnisClass = document.getElementById("OmnisClass").value
var SearchValue = document.getElementById("SearchValue").value
var URL = CGI + "?" + "OmnisServer=" + OmnisServer + "&OmnisLibrary=" + OmnisLibrary + "&OmnisClass=" + OmnisClass + "&SearchValue=" + SearchValue;
//alert("URL = " + URL);
// Get a reference to the frame
var rFrame = document.getElementById("SearchResults");
// Point the frame to the URL
rFrame.src = URL ;
}
- Make a backup copy of your searchcountries.htm and countries.js files.
- Modify the searchcountries.htm file to match the above HTML.
- Modify the countries.ja file to match the above JavaScript.
- Test the modified web page to make sure it still works.
Making the Page Pretty
So far we haven't worried about the look of our web page. Function before form, right? Function is working, so we can move on to form. This is were CSS (Cascading Style Sheets) come into play. CSS to web pages is like #STYLES to Omnis Studio. CSS is the way to go for controlling the look of your web pages!
Using a .css file we can specify the look we want for any of the elements in the web page. This frees us from cluttering the HTML in the web page with all kinds of colour and style related tags. It also allows us to instantly change the look of all our web pages from one point, the CSS file.
The cleanest way I have found for controlling elements on a web page with CSS is to put blocks of elements inside <div> tags.
- Create a css directory in your localhost's web server folder.
- Start a new text file using your text editor.
- Enter the following text in the new file.
body, input, textarea, table {
font-family: lucida grande, geneva, helvetica, arial, sans-serif;
font-size: 9pt;
}
form {
margin: 0px;
}
input, textarea {
padding-left: 2px;
}
div.container {
background-color: #F2F2F2;
border: 1px solid gray;
} - Save the file as, master.css, to the css directory
We now need to point the static web page to the master.css file and add the container division.
- Open searchcountries.htm
- Add the following link tag to the <head> section of the web page.
<link rel="stylesheet" type="text/css" href="http://localhost/css/master.css" /> - Add the following <div> tag just below the opening <body> tag
<div class="container"> <!-- open container div --> - Add the following <div> tag just above the closing </body> tag
</div> <!-- close container div --> - Save the changes.
- Reload the page in FireFox. The page background should change to grey and the font should change to a san-serif type of font.
When making this tutorial the <iframe> section showed a heavy black border in FireFox and no border in Safari. I tried setting the border to zero using the CSS but did not succeed. To eliminate the thick black frame border.
- Open searchcountries.htm
- Add the property to the opeinng iframe tag.
frameborder="0"
The full tag should read:
<iframe id="SearchResults" name="SearchResults" src="" width="100%" height="100%" scrolling="yes" frameborder="0"></iframe> - Save the changes.
- Reload the page in FireFox. The frame border should disappear.
Title Division
Let's put the <h3> title located inside the body into a title division which we can control from the master.css file.
- Add the following <div> tag just below the opening container division.
<div class="title">Countries</div> <!-- title div --> - Delete the entire old <h3> tagged title from the body section.
- Save the changes.
- Add the following CSS to the master.css file.
div.title {
font-size: 11pt;
font-weight: bold;
text-align: left;
padding-top: 5px;
padding-left: 20px;
margin-bottom: 0px;
} - Save the changes.
- Reload the page in FireFox. The title inside the body should now be bold and in bigger font.
Search Division
Let's put the search related fields in a search division which we can control from the master.css file.
- Add the following <div> tag just below the title division.
<div class="search"> <!-- open search div --> - Add the following </div> tag just above the close container div tag.
</div> <!-- close search div --> - Save the changes.
- Add the following CSS to the master.css file.
div.search {
margin: 10px;
padding: 5px;
padding-top: 0px;
border-collapse: collapse;
border: 1px solid gray;
} - Save the changes.
- Reload the page in FireFox. The search related fields should now be inside a grey border box.
Headed List Div - CSS
We want to search results to look a bit more like an Omnis Studio headed list. This is going to take a bit more work. The entire results page is coming from our Omnis Studio application, so we will have to add CSS page links and div tags to the code in our Omnis Studio application.
First create a headedlist.css file.
- Start a new text file using your text editor.
- Enter the following text in the new file.
div.headedlist {
margin: 0px;
padding: 5px;
}
div.headedlist table {
border-collapse: collapse;
border: 1px solid gray;
}
div.headedlist table th {
padding-left: 5px;
padding-right: 5px;
text-align: left;
border: 1px solid gray;
background-color: #99CCFF;
}
div.headedlist table td {
padding-left: 5px;
padding-right: 5px;
border-left: 1px solid gray;
border-right: 1px solid gray;
border-bottom: 1px solid gray;
}
div.headedlist table caption {
padding-top: 3px;
caption-side: bottom;
text-align: center;
} - Save the file as, headedlist.css, to the css directory
Headed List Div - oHTMLTools
Now it's time to modify some code in the ContactsWeb library.
- Add a $retCSSLinkTag method to oHTMLTools
- Add a parameter, pURLToCSSfile, Character type.
- Enter the following code in the method.
; Prepare a link tag pointing the specified CSS file.
Calculate Tag as con('<link rel="stylesheet" type="text/css" href="',pURLtoCSSfile,'" />')
Quit method Tag - Modify the $retHTMLPageTemplate method to read as follows:
Begin text block
Text: <html> (Carriage return,Linefeed)
Text: <head> (Carriage return,Linefeed)
Text: <title>##TITLE##</title> (Carriage return,Linefeed)
Text: ##LINK## (Carriage return,Linefeed)
Text: ##JAVASCRIPT## (Carriage return,Linefeed)
Text: </head> (Carriage return,Linefeed)
Text: <body> (Carriage return,Linefeed)
Text: (Carriage return,Linefeed)
Text: <div class="container"> <!-- begin container div --> (Carriage return,Linefeed)
Text: (Carriage return,Linefeed)
Text: ##BODY## (Carriage return,Linefeed)
Text: (Carriage return,Linefeed)
Text: </div> <!-- close container div --> (Carriage return,Linefeed)
Text: (Carriage return,Linefeed)
Text: </body> (Carriage return,Linefeed)
Text: </html> (Carriage return,Linefeed)
End text block
Get text block HTML
Quit method HTML - Modify the first part of the $convertListToHTMLTable method to read as follows:
Calculate List as pfList
; Open the div
Calculate HTML as con(HTML,kCr,'<div class="headedlist"> <!-- open headed list div -->')
; Open the table
Calculate HTML as con(HTML,kCr,kTableOpenTag)
This adds the opening headed list <div> tag to the HTML. - Modify the last part of the $convertListToHTMLTable method to read as follows:
; Close the table.
Calculate HTML as con(HTML,kCr,kTableCloseTag)
; Close the div
Calculate HTML as con(HTML,kCr,'</div> <!-- close headed list div -->')
Quit method HTML
This adds the closing headed list <div> tag to the HTML.
Headed List Div - rtCountryList
We need to modify the $construct method of rtCountryList. Modify the section of code from, ; Get an HTML page template to ; Add the HTTP content header , to read as follows:; Get an HTML page template.
Do ioHTMLTools.$retHTMLPageTemplate() Returns HTML
Do ioHTMLTools.$retCSSLinkTag("http://localhost/css/master.css") Returns MasterCSSLink
Do ioHTMLTools.$retCSSLinkTag("http://localhost/css/headedlist.css") Returns HeadedListCSS
Calculate LinkTags as con(MasterCSSLink,kCr,HeadedListCSS)
; Replace the placeholders with content.
Calculate HTML as replaceall(HTML,'##LINK##',LinkTags)
Calculate HTML as replaceall(HTML,'##JAVASCRIPT##','')
Calculate HTML as replaceall(HTML,'##TITLE##','Countries')
Calculate HTML as replaceall(HTML,'##BODY##',TableHTML)
; Add the HTTP content header.
Do ioHTMLTools.$addHTTPContentHeader(HTML) Returns FlagOK
Test the Headed List CSS
We are ready to test the headed list CSS.
- Reload searchcountries.htm in FireFox.
- Click the button on the web page.
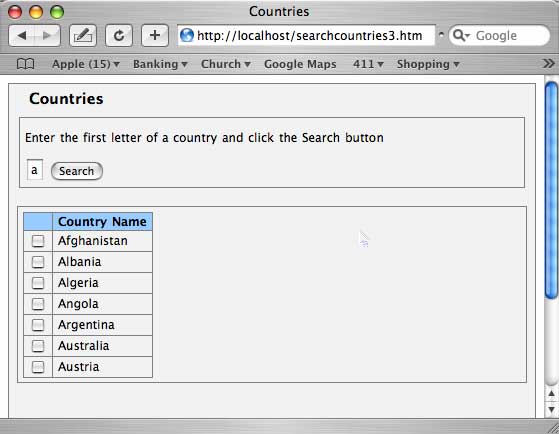
All going well, the table in the SearchResults frame should appear with grey borders and dividers and the column headings should be have a light blue background.
Are you getting a sense of how you can control the look of web pages using CSS? CSS is the place to control the appearance of your web pages.
Unfortunately, Internet Explorer is not a fully WC3 compliant. There are a few CSS snags that you will run into between FireFox, Internet Explorer, and Safari. If you run into one of these, do a Google search and you'll likely be able to find a work around.
Summary
Well that wraps up the tutorial. I hope that you enjoyed this tutorial and got a taste for what you can do with Omnis Studio by combining HTML, JavaScript, and CSS with the Omnis Web App Server.
If this tutorial has been helpful please send an emai to doug@vencor.ca. It's always encouraging to hear from developers who have benefited from these tutorials. Be sure to include any suggestions for improvements or additional topics you would like to see covered.
Visit www.studiotips.net to find out more and to become a . Your support is greatly appreciated!
Happy coding!
Doug KuyvenhovenVencor Software