Tips_tutorials > Studio101 > Report Class
Report Class
In this section we will add a report class for printing a list of countries.Create a Report Class
To create the report class:
- > select Contacts library > click > click .
- Name the report class, rCountryList.
- Select rCountryList, press F8 to go to the class methods.
- > tab > add the following instance variables:
- iList
- List
- iTitle
- Character
- 100 - Select the $construct report class method in the treelist.
- Add the following variables to the tab:
- pfList
- Field Reference
- pTitle
- Character
- 100 - Add the following code to the $construct method:
; Copy the parameters to ivars.
Calculate iList as pfList
Calculate iTitle as pTitle - Close the method editor to return to the
- Double-click rCountryList to open the report class editor.
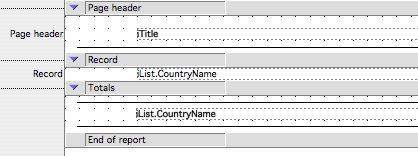
- Press F6 to open the and set the following report class properties:
tab
$islist - kTrue
$mainlist - iList
tab
$pageheader - kTrue
$totals - kTrue - Click anywhere on the report class editor and then press F3 to open the .
- Drag an field from the component store to the middle line of the section of the report class.
- With the entry field selected in the report class, press F6 to open the
- Set the following properties of the entry field:
tab
$dataname - iTitle
$left - 1
$width - 6
tab
$fontstyle - kBold - Drag another field from the component store to the middle line of the section of the report class.
- With the entry field selected in the report class, press F6 to open the
- Set the following properties of the entry field:
tab
$dataname - iList.CountryName
$left - 1
$width - 6 - Ctrl/Cmnd-click the empty line above the entry field in the section. The line should be hilited to indicate that it is selected.
- Ctrl/Cmnd-click the empty line below the entry field in the section. The line should be hilited to indicate that it is selected.
- Click the button in the report class editor toolbar. The empty line above and below the entry field in the section should be deleted.
- Drag another field from the component store to the middle line of the section of the report class.
- With the entry field selected in the report class, press F6 to open the
- Set the following properties of the entry field:
tab
$dataname - iList.CountryName
$left - 1
$width - 6
$totalmode - kTmCount
tab
$fontstyle - kBold - Click the button in the toolbar.
- Single-click the object in the to select the line drawing tool.
- Draw a horizontal line below the iTitle field in section of the report class. After you have drawn the line object in the report class you can select it and drag the handles at either end of the line to change the line.
- Select the line object in the section of the report class.
- Ctrl/Opt+Drag the line object in the section of the report class to the first line of the section. This should create a copy of the line in the section.
- Ctrl/Opt+Drag the line object in the first line of the section of the report class to the third line of the section. This should create another copy of the line in the section.

- Close the report class editor window.
Add a Print Button
We'll now add a button to the wCountryList window class. The button will be used to print the rCountryList report.
- > select Contacts library > double-click .
- Drag a object from the onto the BottomContainer scrollbox.
- With the pushbutton object selected set the following properties in the .
tab
$name - Print
$text - Print
$left - 25 - Double-click the Print pushbutton object to get to the object's methods.
- Enter the following code in the $event method of the Print pushbutton object.
On evClick
If #SHIFT
Breakpoint
End If
; Set the current report class and report destination.
Begin reversible block
Set report name rCountryList
Send to screen
End reversible block
; Pass this window's list variable and title to the report's $construct method.
Print report {(iList,$cinst.$title)}
Test the Report
We are ready to test the rCountryList report class.
- menu > select menu line.
- Click the button.
- All going well the rCountryList report will be printed to the screen.