Tips_tutorials > Studio101 > Getting Started
Getting Started
In this section of the tutorial we we will prepare the folders and add the files needed for a Contacts application which we will be building. We will also create a table in the database and insert some records.
You will need a developer version of Omnis Studio. The standard edition v4.0 is the minimum version.
One of the features I really like about Omnis Studio version 4 is the notation helper. It save a lot of keystrokes. I find the default setting of 1000 milliseconds a bit slow and recommend you reduce the setting to 50 milliseconds.
- Open the Omnis Studio > Property Manager window > General tab
- Set the $notationhelptimer value to 50
Create Folders
We need to create some folders on your computer's hard drive to contain the Omnis Studio library and data file which we are going to create.
- Create a new folder on your desktop.
- Name the new folder Contacts. The Omnis Studio library will be contained in this folder.
- Create a subfolder inside the Contacts folder.
- Name the subfolder data. The Omnis Studio data file will be contained in this subfolder.
Once the files are added the folder/file structure will be as follows:

Create Library
We need an Omnis Studio library to contain the classes and code which make up our Omnis Studio application.
- Open Omnis Studio.
- > select node > click .
- Navigate to the Contacts folder on your desktop and enter Contacts.lbs for the library name.
- Click the button. Omnis Studio creates the new library file and opens it. You will see a Contacts library in the treelist.
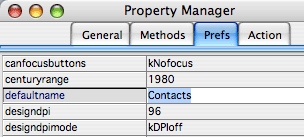
By default the library name matches the file name. If the file name changes, so does the library name. Changing the library name causes problems in multi-library applications, so it is a good practice to set the $defaultname library property. - Select the Contacts library in the treelist > > tab.
- Enter Contacts in the $defaultname property.
Create Data File
We need a database to store the records created by our Omnis Studio application. The database could be any third party RDBMS. For this tutorial will be we using the Omnis data file for the database.
- > select > click .
- Select the OMNISSQL session and click .
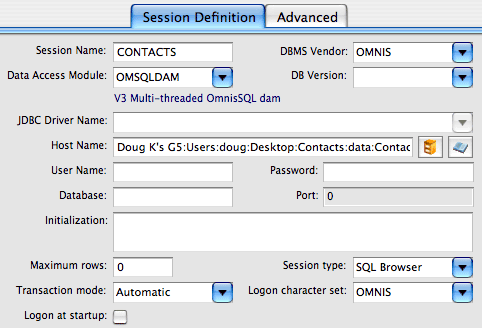
- Double-click the duplicate session to edit the session settings.
- Change the session name to CONTACTS.
- Click the button. (The file cabinet button at the end of the entry field.)
- Navigate to the Contacts/data subfolder.
- Enter ContactsData.df1 for the data file name and click the button. Omnis Studio will create the data file and the path to the data file will appear in the entry field.
- Click the button.
- Click the button.
- Click the button.
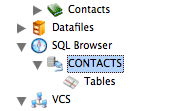
- Click the CONTACTS session. Omnis Studio will open a SQL session with the ContactsData.df1 data file and CONTACTS will appears as a child node of in the treelist.
Create a Table from a Schema Class
Within the database we need to create tables. Each table stores a set of records.
Tables have columns. The columns store specific fields of information about each record.
To begin we will create a Country table for storing the names of different countries. There are numerous ways of creating tables in Omnis Studio.
First we will create the Country table by creating a schema class and then dragging the schema class on to the CONTACTS session in the .
- > select library > click > click .
- Name the new schema, sCountry.
- Double-click the sCountry schema class.
- Enter Country as the .
- In row 1 of the schema class enter the following:
- Country_pkey
- Number
- Long integer
- kTrue
- kTrue
This is the primary key column. The primary key must be unique for each record in the table. The primary key is normally hidden from the user and once created is normally never changed. - In row 2 of the schema class enter the following:
- CountryName
- Character
- 30
- kFalse
- kTrue

- Close the sCountry schema class.
- > select sCounty and drag it onto the CONTACTS session of the node. Omnis Studio will automatically create the Country table in the ContactsData.df1 data file with the columns specified in the schema class.
- > > CONTACTS > > select Country > click .
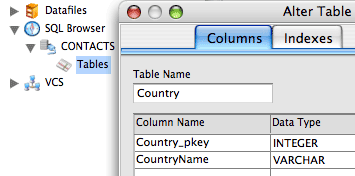
- You will see that Omnis Studio has created the table with the columns specified in the sCountry schema class. One problem with this technique of creating tables from schema classes is that Omnis Studio does not create any indexes or constraints for you. If you click the tab in the window you will see that no indexes have been created. The primary key should always have a unique index, and in this table we want the CountryName to also have a unique index. The indexes will have to be added using SQL scripts.
- Close the window.
- F2 Browser > select the Country table > click > click to delete the table.
Create a Table using SQL
This time we will create the Country table using SQL.
- > > select CONTACTS session > click
- Enter the following SQL script in the Interactive SQL window:
CREATE TABLE Country (Country_pkey INTEGER NOT NULL,CountryName VARCHAR (30) NOT NULL)
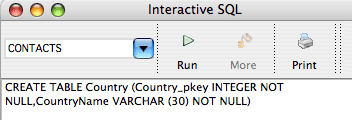
- Click the button to execute the SQL script.
- Enter the following SQL script in the Interactive SQL window to create a unique index on the primary key column:
CREATE CASE SENSITIVE UNIQUE INDEX Country_pkey ON Country (Country_pkey)
- Click the button to execute the SQL script.
- Enter the following SQL script in the Interactive SQL window to create a unique index on the CountryName column:
CREATE CASE SENSITIVE UNIQUE INDEX CountryName ON Country (CountryName)
- Click the button to execute the SQL script.
- > > select CONTACTS session > > select Country > click
- This time if you click the tab in the window you will see the unique indexes which were created by the SQL scripts which we executed.

The above SQL scripts used to create the unique indexes is specific to the Omnis data file. For creating unique index constraints on other databases check the documentation specific to the RDBMS.
Insert Data
Insert some data into the Country table using the .
- > > select CONTACTS session > click
- Enter the following:
- 1001
- Australia - Click the button.
- Close the window.
- Click . The country which you entered should show up in the list.
Insert some more data into the Country table using SQL scripts.
- > > select CONTACTS session > click
- Enter the following SQL script:
INSERT INTO Country VALUES (1002,'Canada')
Be sure to include the quotes around the country name. - Click the button.
- Repeat the above steps for:
INSERT INTO Country VALUES (1003,'UK')
INSERT INTO Country VALUES (1004,'USA') - Close the window.
- Click . The countries which you entered should show up in the list.
Summary
In this section of the tutorial we have completed the following:
- Created the folders which contain our Contacts application.
- Created a library which wil contain the classes and code for our application.
- Created a database to store information for our application.
- Created a Country table in the database using SQL.
- Added some country records to the table using SQL.