Tips_sql > Postgresql > Installing PostgreSQL on Mac OS X 10.5 Leopard
Installing PostgreSQL on Mac OS X 10.5 Leopard
I tried to install PostgreSQL on a fresh out of the box Mac Mini with Mac OS X 10.5 (Leopard) using the installations in StudioTips that I had used for installation on Mac OS X 10.4 but I couldn't get it to wouldn't work.
Apple made changes in Leopard ( is gone), and PostgreSQLforMac made changes in their unified installer 8.3.0 (setting the postgres user to a hidden user).
After a bunch of searching and trouble shooting I managed to get the PostgreSQLforMac 8.3 universal installer to work with Mac OS X 10.5. I decided to create a new set of PostgreSQL instructions specifically for Mac OS X 10.5 and renamed the old instructions to be specifically for Mac OS X 10.4
This section covers the steps involved with installing and configuring PostgreSQL on Mac OS X 10.5 using the PostgreSQLforMac 8.3 unified installer.Install PostgreSQL and pgAdmin
Get the following files off the internet and install them on your Mac OS X computer. (As of PostgreSQL 8)
- PostgreSQL_8...-Unified.dmg - Go to www.postgresqlformac.com
- Double click the dmg and follow the installation instructions to install PG on your Mac OS X computer.
It will create a directory at /Library/PostgreSQL8/ and install the files there.
It will create a directory at /Applications/PostgreSQL/ and install a couple of applications there. - pgadmin3...-rc1.dmg - Go to www.pgadmin.org
- Double click the dmg and drag the pgAdmin3.app file to the Applications folder on your Mac OS X computer.
Test Starting PostgreSQL
Before tinkering with configuration files I suggest you test to see whether or not PostgreSQL will startup.
- Open the app found in /Applications/PostgresQL/
- Click the button in the window.
All going well the displayed in the window will change from to
Troubleshooting PostgreSQL
It's nice when things go smoothly for the installation, but sometimes they don't. The first time I tried installing PostgreSQL on a brand new Mac Mini with Mac OS X 10.5 it wouldn't start. After numerous Google searches I found some helpful advice on how to track down and solve the problem.
The following steps were taken to figure out why PostgreSQL wouldn't start up after I installed it.
- Failed attempt to start PostgreSQL using the app.
- Open the Activity Manager app found in /Applications/Utilities/, set the selector to , and click the column heading to sort the list by process name. Look down the list for postgres. You won't see it in list if PostgreSQL failed to start.
- Open the app /Applications/Utilities/ and scroll down to the bottom of the list. Check the date and time of the last entries. They should be very recent.
Look for log entries like Starting PostgresSQL database server, and server starting. - Make a second attempt to start PostgreSQL using the app. You should see some new lines get added to the log entries list. The last line should tell you what error(s) are preventing PostgreSQL from starting.
In my case the problem was logged as:
sh: /Library/PostgreSQL8/log/PostgreSQL8.log: Permission denied - After some Google searches I found the answer. If this is the problem you are hitting try this from the app.
sudo chown -R postgres:admin /Library/PostgreSQL8/log
By the time you read this, the PostgreSQL 8.3 for Mac universal installer will likely be fixed, but the point of this topic is to show you how to troubleshoot PostgreSQL problems. - After doing the sudo chown from the I went to the app and tried again to start PostgreSQL.
- Success! In a few seconds the changed to
Operational . - To confirm, go to the app and check to see if any postgres processes are in the list.
Edit Global Bash Profile
You need to edit the global bash profile as follows:
- Open the application.
- Type sudo pico /etc/profile
- You will be prompted to enter your password.
- Add the following text to the end of the file:
export PATH=/Library/PostgreSQL8/bin:$PATH
export PGDATA=/Library/PostgreSQL8/data
PostgreSQL8 in the above text might be something different depending on the version you installed. Check on your computer in the HardDrive/Library/ folder to verify the name of your installed PostgreSQL folder. - Press Ctrl+x to Exit. Press y to save the changes. Press the Return key to save the file.
Setup Shared Memory Settings
You need to change the Shared Memory Settings. This is done so that you can increase the shared_buffers parameter to greater than the standard 8MB. Shared buffers allow PostgreSQL to use much more memory and can improve performance quite dramatically.
Set up a sysctl.conf file as follows:
- Open the application.
- Create/edit the file as the super user. Enter: sudo pico /etc/sysctl.conf
- You will be prompted to enter your password.
- Enter the following text in the file.
kern.sysv.shmmax=524288000
kern.sysv.shmmin=1
kern.sysv.shmmni=64
kern.sysv.shmseg=16
kern.sysv.semmns=130
kern.sysv.shmall=131072000
kern.sysv.maxproc=2048
kern.maxprocperuid=512

shmmax is the key setting; it is in bytes. The value in this example is 500MB. If the machine has more memory to use, then this should be increased as well. shmall is the shmmax setting divided by 4.
1 MB = 1048576 bytes - Exit and save the file. (Ctrl+X, y, Return)
PostgreSQL Access Settings
This file controls all access to the PostgreSQL server. In order for clients to connect to the server their IP address must be in the allowed list of users. The two common methods that you will see being used are md5 and trust. Md5 does md5 password authentication and should be used for just about all entries to this file. Trust allows clients to connect without password authentication, the only entry trust should ever have is for the local server machine.
- Open the application.
- Type pico /Library/PostgreSQL8/data/pg_hba.conf
- Press Ctrl+v to scroll down a page at a time to the end of the file.
- Add/Modify the lines to match your settings. trust indicates that the machine can change passwords.
Here is an example of the access settings section in the file:
# TYPE DATABASE USER CIDR-ADDRESS METHOD
# "local" is for Unix domain socket connections only
local all all trust
# IPv4 local connections:
host all all 127.0.0.1/32 trust
host all all 192.168.1.0/24 trust
# IPv6 local connections:
host all all ::1/128 trust - Exit and save the file. (Ctrl+x, y, Return)
NOTE:The CIDR address as noted above has many combinations. Here is an example of the common one's you will see:
192.168.150.50 = 192.168.150.50/32
192.168.150.XXX = 192.168.150.0/24
192.168.XXX.XXX = 192.168.0.0/16
192.XXX.XXX.XXX = 192.0.0.0/8
XXX.XXX.XXX.XXX = 0.0.0.0/0 (This allows everything... probably should never use that)
PostgreSQL Configuration Settings
- Open the application.
- Type sudo pico /Library/PostgreSQL8/data/postgresql.conf
- Ctrl+v to scroll down the file. Ctrl+y to scroll up.
- Edit the property variables as needed.
Parameters that have a # character in front of them are considered not in use. If a parameter that is required has one of these in front, remove the # character before changing the setting.
- Exit and save the file. (Ctrl+x, y, Return)
The following are common properties you may want to verify/change:
- listen_addresses - This value should always = '*'
- shared_buffers - This value should be 20-25% of the systems total RAM.
- temp_buffers - This value should be 50 MB for machines with 2GB of RAM or more and 20 MB for those with less
- work_mem - This value should be 50 MB for machines with 1GB of RAM or more and 20 MB for those with less
- maintenance_work_mem - This value should be 50 MB for machines with 1 GB of RAM or more and 20 MB for those with less
- effective_cache_size - This value should be roughly the amount of free ram(always round down to the nearest 50 MB) as seen in the or without PostgreSQL running. Good to take the reading before installing PostgreSQL.
- redirect_stderr - this value should be set to on
- log_directory - this value should be set to 'pg_log'
- log_filename - this value should be set to 'postgresql-%Y-%m-%d_%H%M%S.log
- log_rotation_age - this value should be set to 7d
- autovacuum - this value should be set to on
1 MB = 1048576 bytes
Starting/Stopping the Database Server
The application which was installed in your Applications/PostgreSQL folder is handy for starting and stopping PostgreSQL.
After you setup all the PostgreSQL configuration stuff you should stop and restart PostgreSQL to make check it still works.
- Open the app.
- Click the button. You will be prompted for your password.
- If all goes well, PostgreSQL will start up and the will change to Operational
If PostgreSQL does not start up, see the topic on .
You are now ready to create uesrs and a database and start using the database server!
The universal installer sets up PostgreSQL to automatically startup when you restart the computer. The startup files can be found in /Library/StartupItems/PostgreSQL/
To stop and start the server from the command line:
- Open the
- Type pg_ctl start or pg_ctl stop or pg_ctl restart
- Optional - Leave the terminal window open to view stderr log messages as you execute queries against the server.
Create Users (Roles)
If you like to separate the roles of superusers and tables owner users, you can create them from the command line.
With what we've done so far, postgres, is the only user, and is a superuser.
If you want to add as a different superuser, you can do so from the command line as follows
- Open the app.
- Enter: createuser superusername -P
- You will be prompted to enter and confirm a password. You can use the same password you have to logon to your Mac.
- You will be asked if you want the user to be a superuser, press y
You may want to add a separate tables owner user if you want a separate role to own all the tables.
I normally create a tablesowner user by the name of dbadmin which owns all of the tables in my databases.
- Open the app.
- Enter: createuser tablesownername -P -U superusername
The superuser is normally postgres. - You will be prompted to enter and confirm a password.
- You will be asked if you want the user to be a superuser, press n
- You will be asked if you want the user to be allowed to create databases, press n
- You will be asked if you want the user to be allowed to grant permissions, press n
To drop a user:
Enter: dropuser username -P -U superusername
As of PostgreSQL 8, users and groups are internally referenced as roles. In the above steps we really created the roles of superusername and tablesownername.
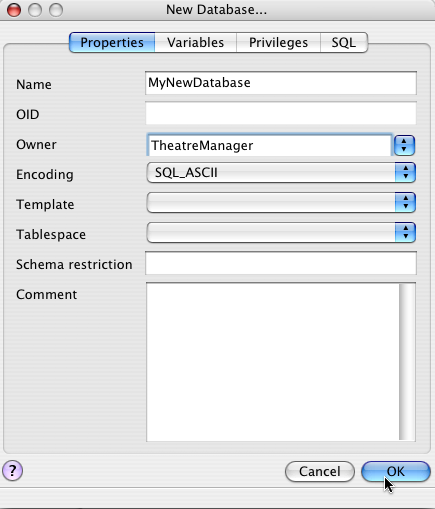
Roles are global across a database cluster installation, not per database.Creating a Database
You can use the app to create new databases.
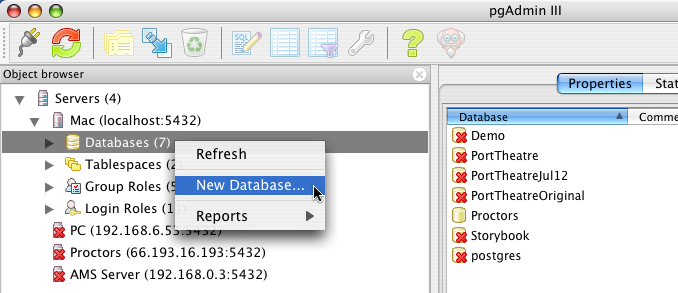
Or you can create databases from the command line as follows:
Enter: createdb databasename -U postgresDrop a Database
You can use the app to create new databases.
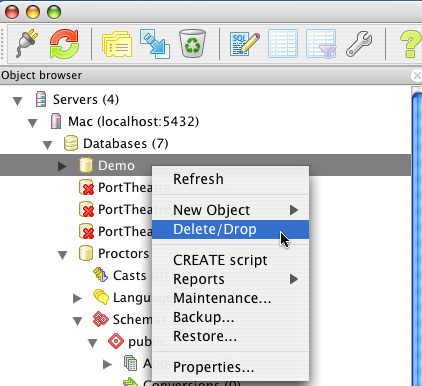
Or you can drop databases from the command line as follows:
Enter: dropdb databasename -U postgresBackup up a Database
To backup a database from the command line on Mac OS X:
- Open the
- Type su - postgres
- You can either do an uncompressed backup or a compressed backup
- Uncompressed - Type pg_dump -U postgres -o [DatabaseName] > [Path]
- Compressed - Type pg_dump -U postgres -o -F c -Z 9 [DatabaseName] > [Path]
[Database] is replaced with the database name.
[Path] is the path where you want to backup to go including the file name and extension.
For uncompressed use the file extension .sql
For compressed use the file extension .backup
Compressed backup example for the database 'Demo' as follows:
e.g For Database 'Demo' -> pg_dump -U postgres -o Demo > /Users/Shared/MyBackups/Demo.sql
pg_dump -U postgres -o -F c -Z 9 Demo > /Users/Shared/MyBackups/Demo.backup
Restoring a Database
To backup a database from the command line on Mac OS X:
- Open the
- Type su - postgres
- You can either do an uncompressed backup or a compressed backup
- Drop the existing database if it exists.
- Create a new database with the same name
- Depending on whether you are restoring from an uncompressed backup or a compressed backup do one of the following:
- Uncompressed - Type: psql [DatabaseName] < [Path]
- Compressed - Type: pg_restore -d [DatabaseName] [Path]
[Database] is replaced with the database name.
[Path] is the path where you want to backup to go including the file name and extension.
Uncompressed:
e.g For Database 'Demo' -> psql Demo < /Users/Shared/MyBackups/Demo.sql
e.g. For Database 'Demo' -> pg_restore -d Demo /Users/Shared/MyBackups/Demo.backup
Executing SQL from the Terminal
You can excecute SQL from the Terminal app command line in a database you have created:
psql databasename -U username
The username you enter will default to being the tablesowner of any tables you create.
All going well you will now be at the psql prompt:
databasename=>
From the psql prompt you can enter whatever SQL commands you like. You must end each SQL command with the ; semi-colon character.
To exit psql enter: \q
If you'd like you can enter the following series of commands from the pgsql prompt to create a table, insert a few records, and then select the records.
- create table t1 (t1_pkey int primary key, ID);
- insert into t1 values (1001,Test1');
- insert into t1 values (1002,Test2');
- select * from t1;