Tips > Utilities > Code Documenter
Code Documenter
is the utiity built into StudioTips which is used to write, edit, and upload all of the documentation found in StudioTips.
has been written so that it can be used to write, edit, and upload documentation for any develoepr's Omnis Studio application.
This sections provides you with a tutorial where you will create your own documentation using Code Documenter and upload it to the studiotips.net site where you will view it with a web browser.Getting Setup
The following tutorial will get you started with writing your own :
- Create a library where you will store your documentation. For this tutorial, name the library, myDocs.lbs. Set the $defaultname property of the library to myDocs, so that the library name won't be changed if someone changes the file name.
Your documentation can be stored in the same library as the real code, or you can choose to store your documentation in a separate library. You can easily move the documention at any time. - If the tipsDocs library is not visible in the , select in the menu.
- Copy the Startup_Task object from the tipsDocs library to your library. Overwrite the existing Startup_Task.
- Copy the oCodeDocProperties object from the tipsDocs library to your library.
- Modify the object's $:GroupName method to return My Documentation or another appropriate group name. The group name will show up in the droplist of the toolbar.
- Modify the object's $:URLCodeDocsFolder method to return 'http://www.studiotips.net/temp/'.
- The other property methods can be modfied later on to suit your requirements.
- Create a folder in your library. Name the folder @ mydocs. Note the space between the @ character and the name.
The folder class name, less the @ prefix, will map to a folder on the website. This is the root folder for this group's documentation. - Inside the folder create an object class. Name it @10 About ;; GroupName. GroupName is the name you gave to your group in the oCodeDocProperties object.
- Go to the class methods of the object and add a method @00 About. Enter some text in the method description entry field located directly below the code list in the method editor.
- Add another method @10 Topic 1 and enter some text in the method description.
- Add another method @20 Topic 2 and enter some text in the method description.
- Close and reopen the window. Your group should now be listed in the toolbar group selector droplist. Select your group in the droplist. The treelist will list the topics.
Entering Documentation
- Right-click anywhere in the documentation field of the and select .
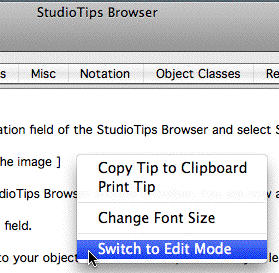
The editor toolbar will be added to the window's toolbar. You are now able to edit text in the documentation field. - Enter some text in the documentation field.
The text you enter is automatically saved to your object's method description when you leave the field. - Close and reopen the window. Your new text should be displayed in the documentation field.
- Double-click a line in section near the bottom of the window. This opens the object class in the to the current method.
- Add a method to the object class. Name it @15 Topic 1.5.
- Close the window.
- Click the buttonin the window toolbar (blue arrows icon to the left of the group selector droplist). The new method should now be listed as a treelist in the order you specified.

The @## prefix controls the sort order of objects and methods. Use the @50 prefix for all objects and methods you want sorted alphapetically.
Uploading Documentation
is written so that the documenation you create can be available locally and online. To upload the documentation you have created.
- Click the toolbar button beside the droplist. This opens the preferences window.
- Enter the : temp@studiotips.net
- Enter the : pass
- Leave the field empty.
- Click the open book icon next to the label. This prompts you to select a folder on your computer where the HTML files will be stored. Create a folder on your desktop and name it temp, then select. The path to the temp folder should be displayed in the field at the bottom of the window.
- Click the button. This tests the FTP connection. All going well an FTP connection will be opened to studiotips.net and you will see a list of files and folders currently in the temp@studiotips.net root directory.
- Close the window to return to the window.
- Right-click one of the nodes in the treelist and select .
An HTML file will be created in the temp folder you created on the desktop. The file will then be uploaded to the temp directory on the studiotips.net website. - Click on the button at the bottom of the window. This will open up your default web browser to the HTML file which you just uploaded.
Creating TOC and All Contents Files
You can also create TOC (Table of Contents) and All Contents files for your documentation.
- Right-click on the treelist and select
This will create and upload all the HTML files for the documentation in the library, plus create a tableof contents file (default index.html) and an all contents file (default all.html) for each in the code documentation tree in your library. - Alt/Option click the button at the bottom of the window.
This will open the default web browser to the table of contents page.
Adding Images
Text only documention is okay, but they say a picture is worth a thousand words. Screenshots are an important part of any code documentation. To add screen shots to your documentation:
- Click anywhere in the documentation field.
- Click the Image icon in the tooblar. This inserts an image source tag in your documentation.
- Enter screenshot.gif in between the double quotes of the image source tag.
You could enter a full http address in the image source. If you just enter a file name, Code Documenter, fills in the rest for you based on the Code Docs Folder Path / Images Folder Name as specified in the preferences. The rest of the path to the image file mirrors the path to the HTML file. - Right-click on a node in the treelist and select .
This creates the sub-folders in the temp folder on your desktop. - Take a screen shot of some window on your computer screen.
- Open the image in an image manipulation program (e.g. Adobe Photoshop) and adjust the image for the web.
This could mean resizing the image and changing it to a GIF or JPG file so that it will load faster into a web browser.
You should adjust the image to 72 or 96 dpi and a reduce or crop the image to maximum width of 580 pixels, so that it will load quickly and fit properly on a pages printed from a web browser. - Save the modified screenshot image to the images folder inside the temp folder on your desktop. Name the saved image as screenshot.gif.
I prefer to use all lowercase for website folder and file names. You can use mixed case names. - Right-click on a node in the treelist and select .
This opens an FTP connection with the server and uploads the images in the local folder to the server automatically creating any sub-folders on the server. - Right-click on a node in the treelist and select so that your revised page with the image source tag is uploaded to the web server.
- Click the button at the bottom of the window. Your documentation page should now load with the screenshot image. You may need to press the reload button in the web browser.
Adding Section Tabs
As your documentation grows you may want to divide it into logical sections which will be displayed in separate tabs in the window.
To create sections:
- Select the @ mydocs folder in the
- Click the button to create a subfolder inside @ mydocs.
- Name the folder @10 About.
- Drag the @10 About ;; My Documentation object class from the @ mydocs folder to the @10 About folder.
- Select the @ mydocs folder in the
- Click the button to create a subfolder inside @ mydocs.
- Name the folder @50 Tutorial.
- Double-click the @ @50 Tutorial folder in the
- Click the button and create an object class inside the @ @50 Tutorial folder.
- Name the object class @10 Getting Started.
- Double-click the @10 Getting Startedobject class to get to its methods.
- Add an @00 About method to the @10 Getting Started object class.
- Add an @10 Step 1 method to the @10 Getting Started object class.
- Add an @20 Step 2 method to the @10 Getting Started object class.
- Close the method editor.
- Right-click the @10 Getting Started object class and select .
- Rename the duplicate class to @20 Next Steps.
- Open the , select My Documentation in the groups selector, then click the Rebuild Cached Lists button. Two tabs, About & Tutorial, should now appear in the window.
Code Documenter Toolbar
The toolbar can be used to add special HTML tags to your documentation. Some of the tags are actual HTML tags, others are use to generate special tags used by CSS.
As you hover over each toolbar button a tooltip provides you with helpful information about the tag.
You can browse the StudioTips tips in the in to see how the tags are used.
Most of the tags which you see in are removed when you switch to .Special @ Tags
There are some special @ tags which you can use in your documentation.
If you include and @SAMPLECODE:1 tag starting on a new line in your documentation, will replace it in and in the HTML generated with the actual code you put in that tip's method in the method editor.
The sample code in the method editor must begin with the @SAMPLECODE:1 tag and end with an @ENDSAMPLECODE tag.
Within the same tip you can have @SAMPLECODE:2, @SAMPLECODE:3,...
You can see how the following @SAMPLECODE tag works by switching back and forth between and in the .
; This is some sample code.
Calculate #S1 as 'Some value'
Summary
You now have the basics for creating documentation using Code Documenter. Feel free to use Code Documenter for generating your own documentation. The benefits of using Code Documenter are numerous:
- Documentation always right there imbedded with your Omnis Studio libraries.
- If you are using the VCS with multiple libraires, all of the developers can get the lastest documentation from the VCS, and can update the documentation directly through the VCS.
- Demos and actual Omnis Studio sample code can be included with the documentation.
- You don't have to switch to a different application to write and update the documentation. You simply open the , select the right group, and start writing!